Please feel free to contact our technical team for assistance if you have further queries or need personal advice.
RAL-GZ 615
DIN EN ISO 24041
Certification:
DIN EN ISO 9001:2008
Environmental Certification:
DIN EN ISO 14001:2009
Technical Terms of Delivery
1. Length and width
Standard sizes of sheets and plates are supplied without cutting after perforation and levelling. Tolerances may be larger than the steel mill tolerances.
Perforated coil/plate (not cut)
| Nominal length from mills | Deviation limit |
|---|---|
| <= 2000 mm | 0/+ 12 |
| <= 3000 mm | 0/+ 14 |
| <= 4000 mm | 0/+ 16 |
| > 4000 mm | 0/+ 18 |
| Nominal width | Deviation limit |
|---|---|
| <= 1200 mm | 0/+ 3 |
| > 1200mm <= 1500 mm | 0/+ 5 |
| > 1500 mm | 0/+ 6 |
Perforated plates (cut)
Standard sizes of sheets and plates are supplied without cutting after perforation and levelling. Tolerances may be larger than the steel mill tolerances.
| Size | up to a thickness of 3 mm | above a thickness of 3 mm | |
|---|---|---|---|
| a1 | b1 | ||
| <= 100 mm | ± 0,5 | ± 1,0 | |
| > 100 mm | < 300 mm | ± 0,8 | ± 1,5 |
| > 300 mm | <= 1000 mm | ± 1,2 | ± 2,0 |
| > 1000 mm | <= 2000 mm | ± 2,0 | ± 3,0 |
| > 2000 mm | <= 4000 mm | ± 3,0 | ± 5,0 |
| > 4000 mm | ± 4,0 | ± 5,0 | |
| Nominal width | Deviation limit |
|---|---|
| <= 1200 mm | 0/+ 3 |
| > 1200mm <= 1500 mm | 0/+ 5 |
| > 1500 mm | 0/+ 6 |
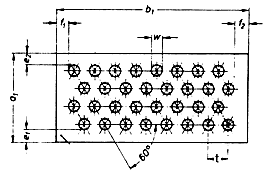
Permissible deviations in width of blank margins for fixed sizes
| Pitch t | permissible deviations for e1, e2, f1, f2 |
|---|---|
| up to 5 mm | ± 5 |
| over 5 bis 20 mm | ± 10 |
| over 20 mm | ± t/2 |
1. Length and width
2. Thickness of plates
3. Squareness of cut plates
4. Edge bows
5. Flatness
6. Wavy edges
7. Blank areas
8. Conical section of hole
9. Punching burr and shearing burr
10. Missing holes / Punch breakage
11. Beginning and end of perforated area
12. Lubricating residue
13. Surfaces
14. Deviations
Technical Informations
Standards and sizes
Basic Terms
Hole Shapes


